HTML, CSS & JS
Review How the Internet Works
HTML, CSS & JavaScript

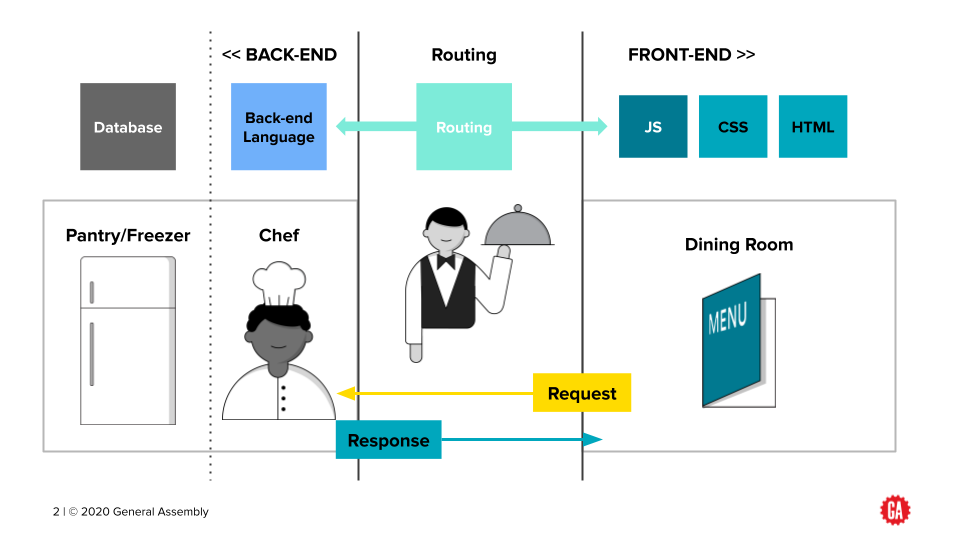
Developing websites is similar to baking a cake. The Hypertext Markup Language (HTML) serves as the structure and content, akin to flour in the recipe – it's considered the backbone of a website and conveys what kind of information users will find on each page.
To create an inviting aesthetic design, Cascading Style Sheets (CSS), like sugar or spices found in any delicious dish, adds colors, fonts and spacing for visual appeal. Finally JavaScript rounds out this web development trifecta comparable to eggs that help bind all other ingredients together; making dynamic effects possible without refreshing pages every time new content appears or elements need changing.
Together, HTML, CSS, and JavaScript are used to create the overall look and feel of a website, and make it interactive for users.
Writing in HTML
The first language we’ll be writing in is HTML (Hypertext Markup Language). HTML will create the objects that will appear on your page before applying any kind of style or establishing any kind of functionality.
💡Think of it this way: If HTML were a part of the body, it would be the bones.
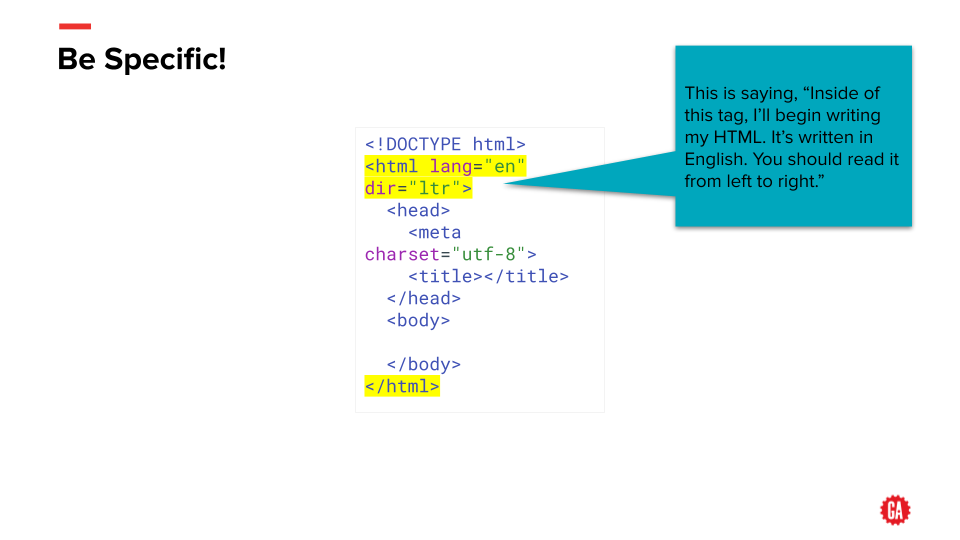
HTML is composed of logically named tags The tags can also have attributes applied to them, to further specify what’s inside of them. Some tags are self-closing*, meaning they don’t have an ending tag.
<div></div>
<p></p>
<br>
<title></title>
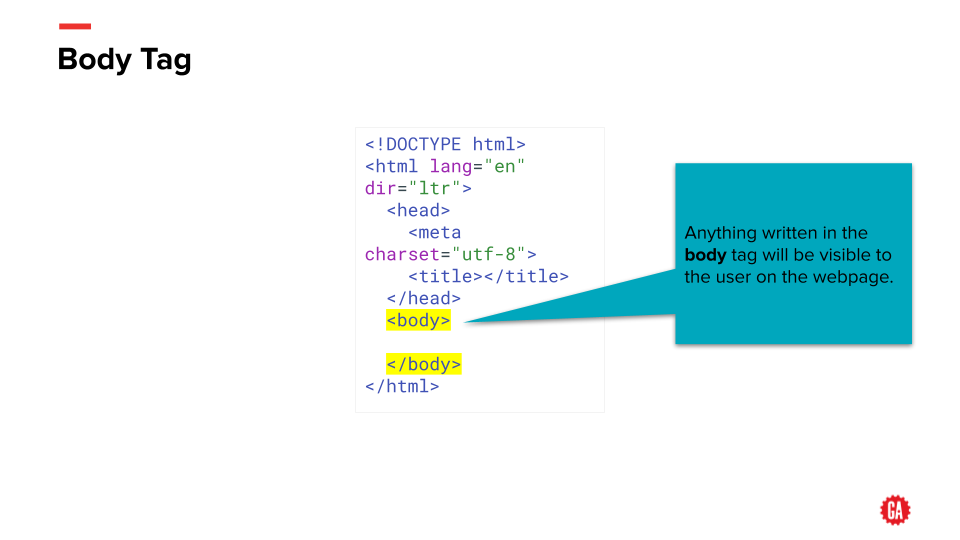
<body></body>
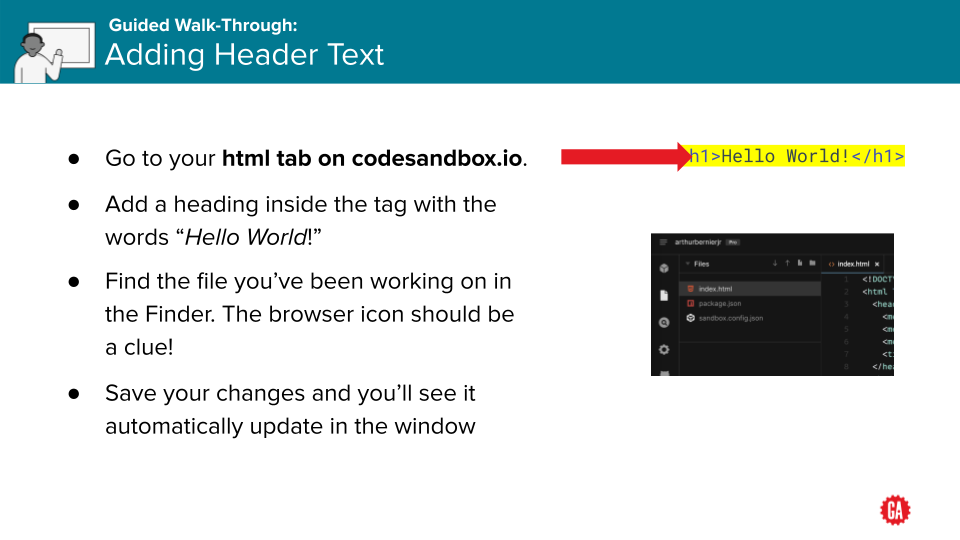
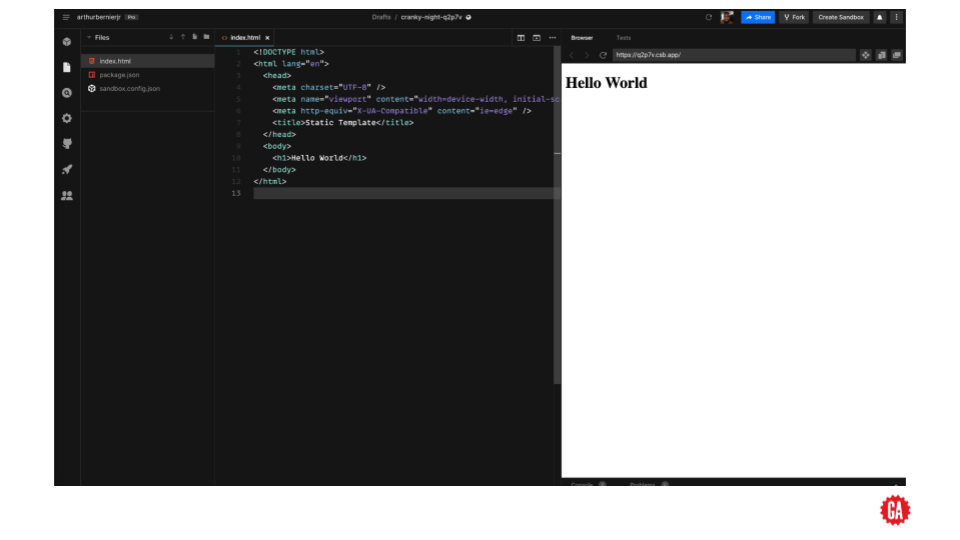
<h1></h1>
<img>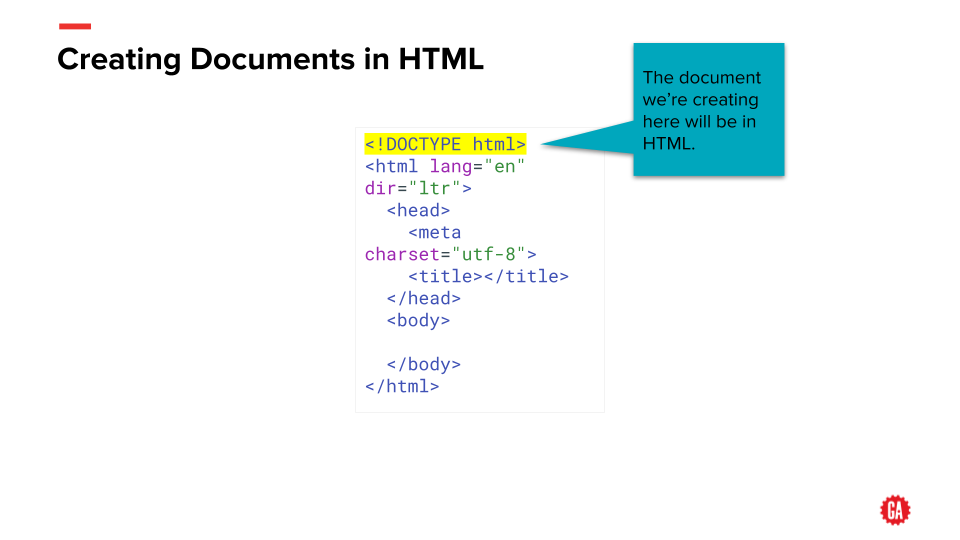

CSS Under The Hood
The CSS Box Model is fundamental to understanding how elements are displayed on a webpage. Every HTML element is treated as a box, and the box model describes how these boxes are structured and how they interact with each other.
🔲 The Four Layers of the Box Model
Each element consists of four layers:
- Content – The actual text, image, or other content inside the element.
- Padding – Space between the content and the border.
- Border – A line surrounding the padding and content.
- Margin – Space outside the border, separating this element from others.
Here’s a visual representation of how the box model works:
+---------------------------+
|        Margin (outer)     | 🟡
|  +---------------------+  |
|  |     Border         |  | 🟠
|  |  +-------------+  |  |
|  |  |  Padding   |  |  | 🔵
|  |  |  Content   |  |  | 🟢
|  |  +-------------+  |  |
|  +---------------------+  |
+---------------------------+
Here is a visual representation of the CSS Box Model, showing the different layers: Content, Padding, Border, and Margin. Each section is labeled to indicate spacing.
Now, let's go deeper into how each part works and how you can control it using CSS.
🔍 Understanding Each Part of the Box Model
1. Content (Innermost Layer)
- This is where the text, image, or any content of an element is displayed.
- Its size can be adjusted using
widthandheightproperties in CSS.
div {
  width: 200px;
  height: 100px;
}
2. Padding (Space Between Content and Border)
- Padding adds space inside the element, between the content and the border.
- Increasing padding makes the element bigger without affecting nearby elements.
div {
  padding: 20px; /* Adds 20px space inside the border */
}
📌 Pro Tip: You can set different values for each side:
div {
  padding: 10px 20px 30px 40px; /* Top, Right, Bottom, Left */
}
3. Border (The Outer Edge of an Element)
- The border wraps around the padding and content.
- It can be styled, colored, or made invisible.
div {
  border: 3px solid black; /* 3px width, solid style, black color */
}
You can also change the style:
div {
  border: 2px dashed blue; /* Dashed border */
}
4. Margin (Space Outside the Border)
- Margin controls the space between elements.
- It prevents elements from getting too close to each other.
div {
  margin: 30px; /* Adds 30px space around the element */
}
📌 Margin can also be set individually:
div {
  margin: 10px 20px 30px 40px; /* Top, Right, Bottom, Left */
}
📝 Box Model in Action
Here’s an example combining all four properties:
div {
  width: 200px;
  height: 100px;
  padding: 20px;
  border: 2px solid black;
  margin: 30px;
}- Width/Height: Defines the actual size of the content.
- Padding: Adds space inside the border.
- Border: Outlines the element.
- Margin: Adds space between this element and others.
📌 Box Sizing: A Common Issue
By default, padding and border increase the size of an element. To prevent this, use:
div {
  box-sizing: border-box;
}
This makes sure the width includes padding and border instead of adding extra space.
Final Thoughts
Understanding the CSS Box Model helps you control spacing, layout, and responsiveness. Mastering it will make your CSS more predictable and consistent across different browsers. 🚀
CSS REFRESHER Intro
When the web started, monitors were all fairly similar. Even when CSS was created and implemented, the way people viewed websites was still quite similar.
Because of this, CSS was designed to have features similar to print and newspaper layouts and many things were set by pixel size and the goal was to have a design be 'pixel perfect'
As monitor technology improved, more widths and sizes became available. Browser technology also advanced in many ways, including allowing for browsers to be resized to nearly any size. Finally, mobile devices were introduced that were not only much smaller than a typical monitor, they also had two possible orientations.
Can I use?
As new technologies arise in HTML and CSS, some browsers are faster to adopt them than others. In the past, IE was often the least able to adapt changes.
To check whether a certain feature is compatible in a browser, we can check a web site called Can I use
Let's search for flexbox (you'll learn about it in a later lesson). As you can see it is fully compatible in all browsers except for IE, where it is partially supported.
Should I Prefix?
If you find a feature that is not supported, or not fully supported, you can go to Should I Prefix
There is a list of CSS features that either no longer require a prefix (coded in green). Or are in blue. If they are blue, you can expand them and see how you would write the vendor prefixes, so you can have compatibility across browsers.
Things are always changing, but right now a feature called appearance requires vendor prefixing. You can see an example below.
For the appearance feature, you would write the property three times. Two times would include the vendor prefix so that it can be used in different browsers.
As you look at older code, you may see vendor prefixes for features that no longer require it. It's ok! It won't break anything. But you won't need to include those vendor prefixes on new work.

You can also use a CSS prefixer to write the prefixes for you, then just copy paste Pleaeease.io
How CSS works
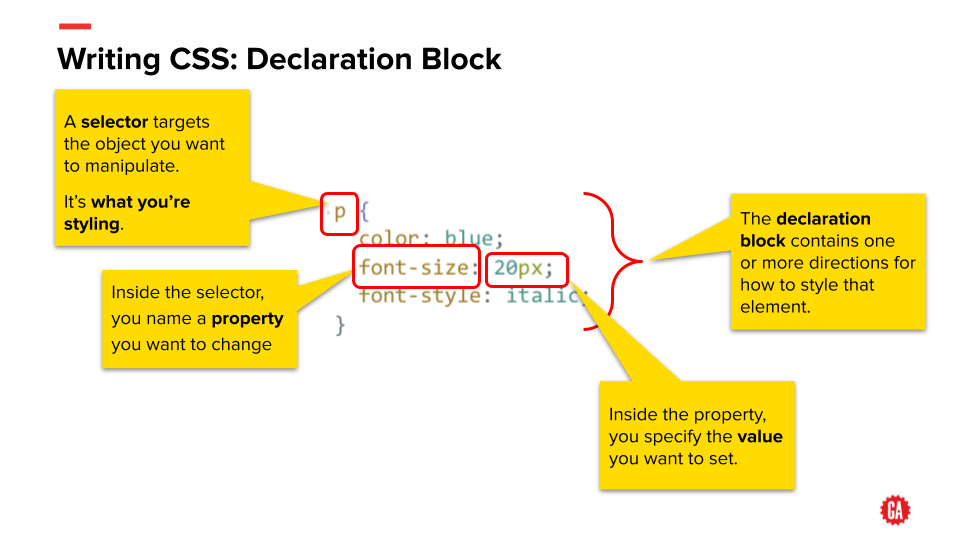
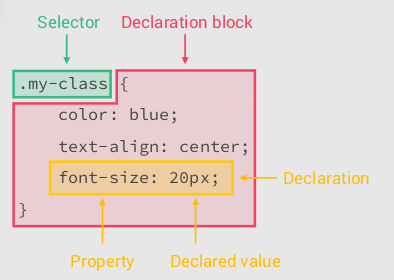
The breakdown of a CSS Selector
How CSS is read by the browser
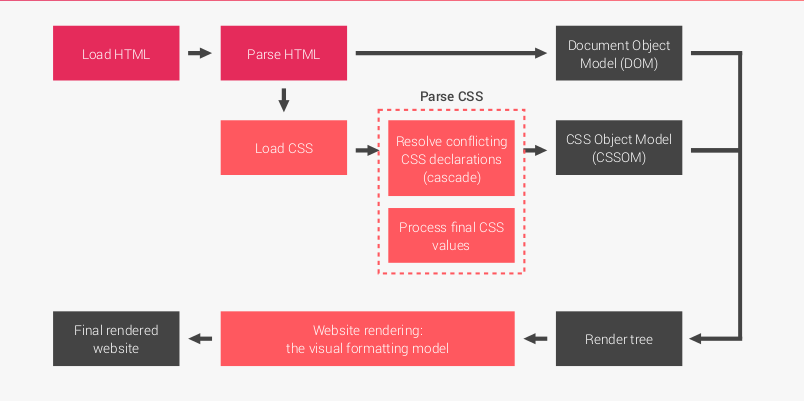
When a webpage is loaded in the browser first the page is loaded, then
the html page is parsed, then the css is loaded and the Dom is created ( more on the Dom next week),
then the CSS is Parsed and the browser decides how to resolve conflicting CSS and processes final values,
Once that happens we then create the CSS Object Model, then we get the render tree, then we render the website with the visual formatting model,
Then we get our website.
Forget Everything I just Said
- You don't need to understand all of that to write good CSS
- Main takeaway is this , the CSS gets parsed and resolves conflicts between your styles
- The way css figures out what CSS should be valued as more important is know as CSS Selector Specificity
- Specificity is what you need to understand

Specificity Broken Down
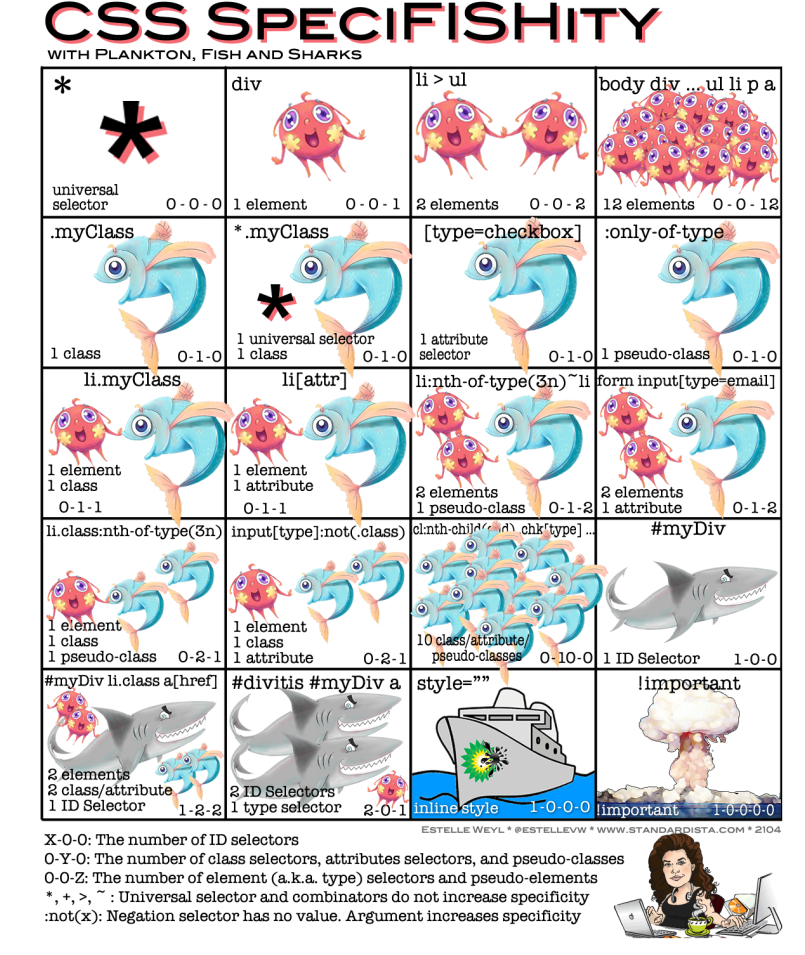
Specificity: How it works
- 0-0-0: Global selector
- 1-0-0: ID selector
- 0-1-0: Class selector (Also attribute selector & pseudoclass)
- 0-0-1: Element Selector
- Descendant Selector Combinator (' ')
- Child Selector Combinator ('>')
- Sibling Selector Combinator ('~')
- Adjacent Sibling Selector Combinator ('+')
| Selector | Example | Description |
|---|---|---|
| element element | div p | Selects all <p> elements inside <div> elements |
| element > element | div > p | Selects all <p> elements where the parent is a <div> element |
| element + element | div + p | Selects the first <p> element that are placed immediately after <div> elements |
| element ~ element | p ~ ul | Selects every <ul> element that are preceded by a <p> element |
Specificity: The less than obvious
The * selector, or global selector, has a specifity of 0.

Combinators, like ~, >, space, and + have no value

ul li {} 0-0-2
ul > li {} 0-0-2
:not has no value, but parameter selector does
Lets write some Code and experiment with this
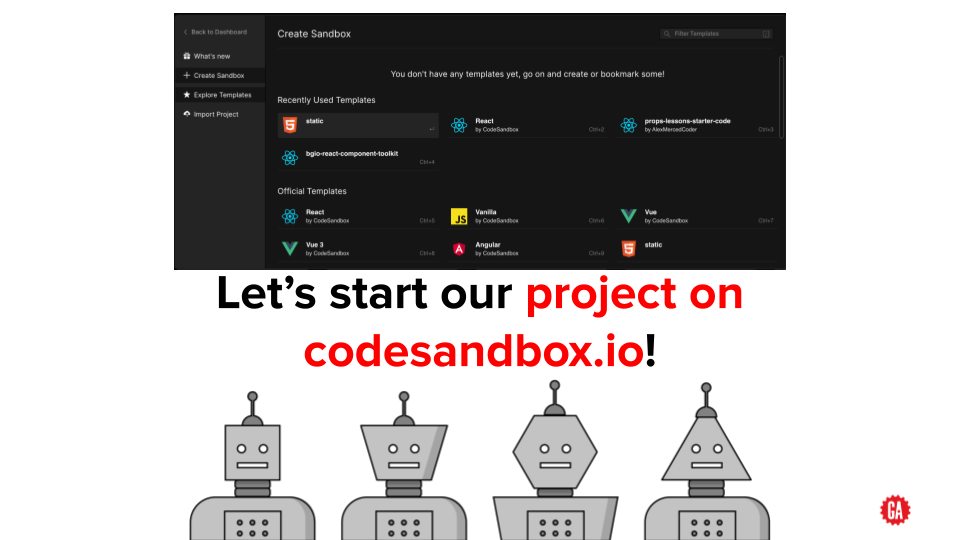
- Go to repl.it instead of JS we will now use it to write some HTML & CSS together with our JS
- Lets play with specifity
- Use document.querySelector
- Display an object in the browser
- Descendant Selector Combinator (' ')
- Child Selector Combinator ('>')
- Sibling Selector Combinator ('~')
- Adjacent Sibling Selector Combinator ('+')
JavaScript's event-driven architecture is a programming model in which the flow of the program is determined by events such as user actions, sensor outputs, or messages from other programs. In this architecture, the program sets up event listeners that wait for specific events to occur, and then triggers a callback function to handle the event when it occurs.
Event-driven programming is at the heart of JavaScript development, enabling developers to respond quickly and efficiently to user actions. An apt analogy for this can be found in a traffic cop - constantly listening out for events such as cars or pedestrians approaching an intersection then triggering appropriate responses like changing lights or activating walk signals. This event-driven architecture allows us to create powerful applications that react seamlessly with our environment!
This type of architecture allows for a non-blocking and asynchronous flow of the program, meaning that the program can continue to execute other tasks while waiting for events to occur, rather than being blocked or held up by a single task. This can greatly improve the performance and responsiveness of the program.
This is also why Brendan Eichs is a genius... literally.
Variables in Js
Variables are like containers that we use in Javascript to store information. They help us remember things, like the name of our favorite color or the number of toys we have. Variables are like labels that allow us to easily access and use the information they contain.
The DOM
The DOM stands for Document Object Model. It is a way for computers to understand and organize information on the internet. It is kind of like a map that shows computers where different parts of a website are located. With the help of the DOM, computers can quickly access and display the information on a website.
Let’s switch back to our HTML view and direct it to look for our JS file. Add a link to our JS file inside the header. This tells our HTML page to look in the JS folder first, then to find a file called “script.js” inside of that folder.
<head>
    <meta charset="utf-8">
    <title></title>
    <link rel="stylesheet" href="/css/style.css">
    <script src="/js/script.js" defer></script>
</head>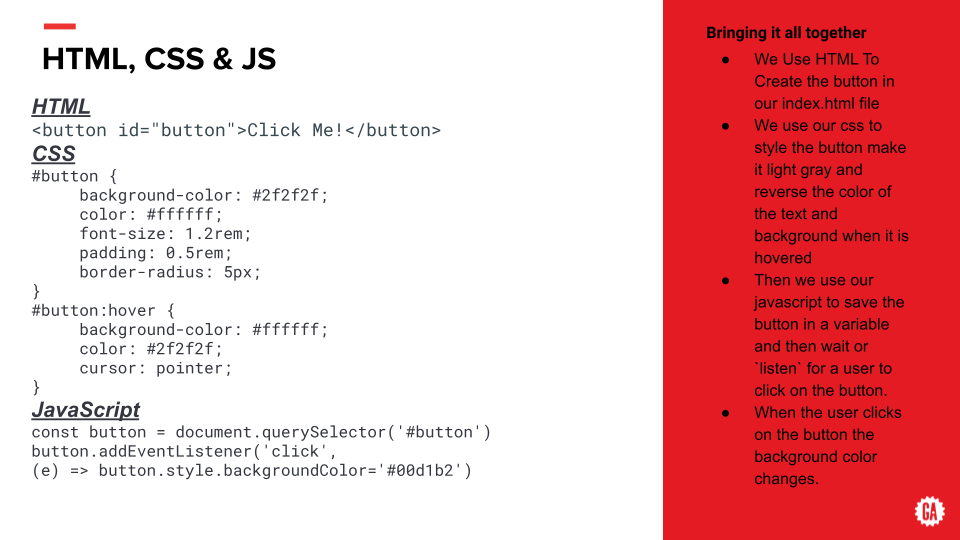
JavaScript Deep Dive: What’s Happening Under the Hood?
So far, you’ve learned that HTML structures a webpage, CSS styles it, and JavaScript makes it interactive. Now, let's take a deeper look at what’s really happening under the hood when JavaScript runs, how the browser processes your code, and why JavaScript works the way it does.
Building upon your understanding of HTML, CSS, and JavaScript, let's delve deeper into how JavaScript operates behind the scenes to make web interactivity possible.
JavaScript Engines: The Powerhouse Behind the Scenes
At the core of JavaScript's functionality lies the JavaScript engine—a specialized program that interprets and executes JavaScript code. Each web browser incorporates its own engine:
- Google Chrome utilizes the V8 engine.
- Mozilla Firefox employs SpiderMonkey.
- Safari uses JavaScriptCore.
These engines are responsible for converting human-readable JavaScript code into machine code that your computer's processor can execute. Modern engines employ a technique called Just-In-Time (JIT) compilation, which compiles code during execution for enhanced performance.
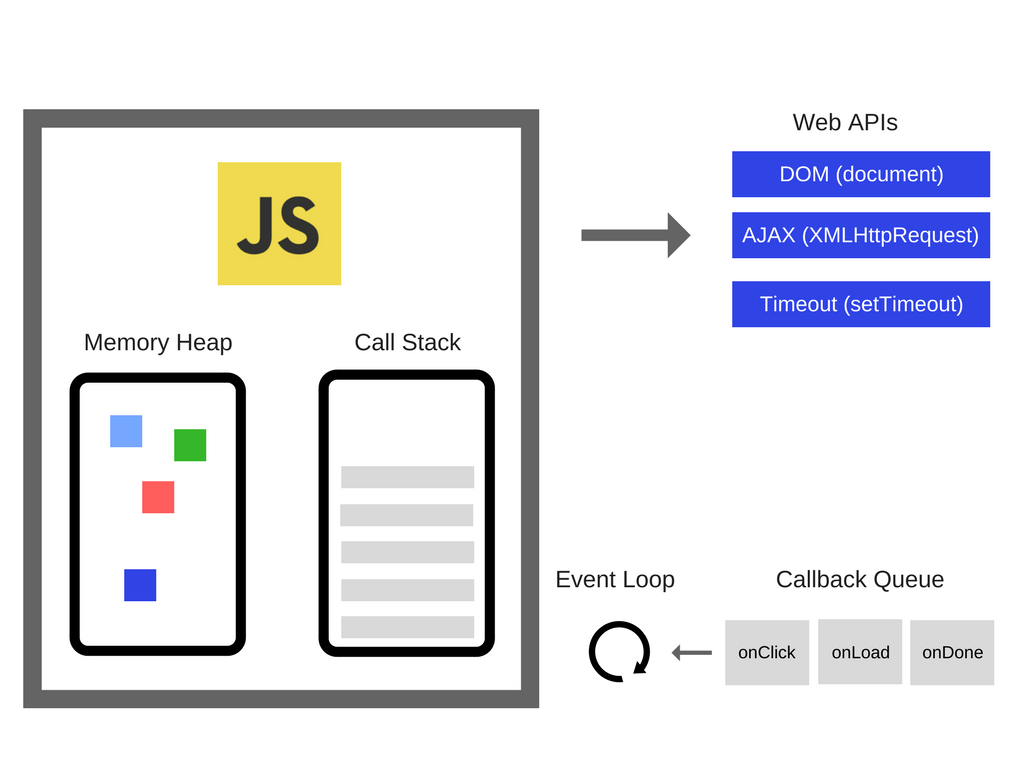
The Event Loop: Managing Tasks Efficiently
JavaScript operates on a single-threaded, non-blocking model, primarily driven by the event loop. This design allows JavaScript to handle multiple tasks efficiently without executing them simultaneously.
Here's a simplified breakdown:
- Call Stack: JavaScript maintains a call stack where functions are added when invoked and removed upon completion.
- Event Table: Functions like event listeners are registered here.
- Event Queue: When events occur (e.g., a button click), the corresponding callback functions are moved to this queue.
- Event Loop: Continuously monitors the call stack and event queue, transferring functions from the queue to the stack when the stack is empty.
This mechanism ensures that tasks are executed efficiently without blocking the main thread.
Memory Management: Handling Resources Wisely
JavaScript manages memory allocation and deallocation automatically through a process known as garbage collection. The engine identifies and frees up memory that is no longer in use, preventing memory leaks and optimizing performance.
Just-In-Time (JIT) Compilation: Speeding Up Execution
To enhance performance, modern JavaScript engines use JIT compilation, which translates JavaScript code into machine code at runtime. This approach combines the benefits of traditional interpretation and ahead-of-time compilation, resulting in faster execution.
Recap: The Code We’re Working With
We’ll use the same button example from before:
HTML (The Structure)
<button id="button">Click Me!</button>This creates a simple button with an id of button, so we can reference it in our CSS and JavaScript.
Understanding the Button Code
<button> is an HTML tag that creates a clickable button on the webpage.
The text “Click Me!” is what will appear on the button.
id="button" is an attribute. An attribute gives extra information about an element. Here, id="button" gives the button a unique name, so we can later reference it in our JavaScript.
Think of HTML like a house’s blueprint. It shows the structure of the webpage, like where a button should appear, but it doesn’t say what color it should be or what happens when you click it.
CSS (The Styling)
#button {
    background-color: #2f2f2f;
    color: #ffffff;
    font-size: 1.2rem;
    padding: 0.5rem;
    border-radius: 5px;
}

#button:hover {
    background-color: #ffffff;
    color: #2f2f2f;
    cursor: pointer;
}
This makes the button look stylish and changes its appearance when hovered.
Breaking Down the CSS Code
#button { ... } – This means "select the element with the id of button" and apply the styles inside the { } brackets.
Inside the {} curly braces:
background-color: #2f2f2f; – Sets the button’s background to a dark gray color.
color: #ffffff; – Sets the text color to white.
font-size: 1.2rem; – Makes the text size slightly bigger.
padding: 0.5rem; – Adds space inside the button, making it look larger.
border-radius: 5px; – Rounds the corners of the button.
#button:hover { ... } – This means "when the user hovers their mouse over the button, change the styles inside {}".
background-color: #ffffff; – The background changes to white.
color: #2f2f2f; – The text turns dark gray.
cursor: pointer; – The cursor turns into a hand when hovering, indicating it's clickable.
Think of CSS like decorating your house. If HTML is the house’s blueprint, CSS is the paint, furniture, and decorations that make it visually appealing.
JavaScript (The Interactivity)
const button = document.querySelector('#button');

button.addEventListener('click',
  (e) => button.style.backgroundColor='#00d1b2'
);
This code listens for a click event on the button and changes its background color when clicked.
Now, let’s go under the hood and see what’s really happening when this JavaScript runs.
What Happens When JavaScript Runs?
Step 1: The JavaScript Engine Interprets the Code
When you open a webpage, the JavaScript engine inside your browser (like V8 in Chrome or SpiderMonkey in Firefox) takes the JavaScript code and compiles it into machine code so your computer can execute it.
Most modern engines use Just-In-Time (JIT) Compilation, which means:
- Instead of translating the entire script before running, JavaScript compiles the code while it’s executing.
- This makes JavaScript faster because it can optimize code while running.
Step 2: The Event Loop and How JavaScript Handles Tasks
JavaScript is single-threaded, meaning it can only do one thing at a time. But how does it handle events like button clicks without freezing?
That’s where the Event Loop comes in.
- Call Stack – JavaScript executes code line by line using a stack (think of a stack of plates, where the last one placed is the first one removed).
- Web APIs – When JavaScript interacts with the browser (like listening for clicks), it delegates tasks to Web APIs.
- Event Queue – Once an event (like a button click) happens, JavaScript queues the event handler.
- Event Loop – JavaScript waits until the stack is empty before handling the next task from the queue.
In our case:
- The browser sees
button.addEventListener('click', ...)and registers the event listener. - When the button is clicked, the event is added to the Event Queue.
- The Event Loop checks if the stack is empty and then executes the function, changing the button’s background color.
Understanding Variables: const vs let vs var
In JavaScript, when we create a variable (a storage box for values), we use const, let, or var. Let’s break them down.
1. const – A Constant Variable (Can’t Change)
const button = document.querySelector('#button');constmeans constant – once assigned, it cannot be changed.- If you try to reassign it, you’ll get an error.
Use const when:
✅ The value should never change (e.g., selecting an element like document.querySelector('#button')).
2. let – A Changeable Variable
let color = 'red';
color = 'blue'; // ✅ No error, value changed.letallows you to change the value.- Unlike
var, it’s block-scoped, meaning it only exists inside the{}where it was declared.
Use let when:
✅ You need a variable that might change later.
3. var – The Old Way (Avoid Using)
var name = 'John';varis function-scoped, which can cause bugs.- Unlike
let,vardoesn’t respect block scope, making it unpredictable.
🚨 Modern JavaScript avoids var in favor of let and const.
Memory Management: How JavaScript Handles Resources
When you create variables and functions, they take up memory. But JavaScript automatically frees memory when it’s no longer needed, using Garbage Collection.
- When we declare
const button = document.querySelector('#button');, JavaScript allocates memory forbutton. - If a variable or object is no longer used, JavaScript’s garbage collector removes it to free up space.
Bringing It All Together: A Full Walkthrough
Now, let's go step by step through what actually happens when this JavaScript code runs:
const button = document.querySelector('#button');- The browser reads the HTML and creates a structure called the DOM (Document Object Model).
- JavaScript finds the button in the DOM and stores it in memory inside the
buttonvariable.
button.addEventListener('click',
  (e) => button.style.backgroundColor='#00d1b2'
);-
JavaScript registers an event listener, telling the browser:
- "When the user clicks the button, run this function."
-
When the button is clicked:
- The event is placed in the Event Queue.
- The Event Loop checks the queue.
- JavaScript executes the function, changing
button.style.backgroundColorto#00d1b2.
Final Analogy: Think of It Like a Restaurant
To make this more relatable, imagine JavaScript is a restaurant:
- HTML is the restaurant’s menu – It shows what’s available, like a button.
- CSS is the decoration – It makes everything look nice, just like a restaurant’s interior.
- JavaScript is the chef – It listens for orders and prepares the food (runs functions).
Now, think of the Event Loop as a kitchen workflow:
- Orders (events) go to the chef (JavaScript engine).
- The chef completes one dish before starting the next (single-threaded).
- If a customer orders something special (like clicking a button), the waiter (browser) queues the request.
- When the chef is ready, they prepare the order.
This is exactly how JavaScript processes events behind the scenes.
Key Takeaways
✅ JavaScript is single-threaded but uses the Event Loop to handle multiple tasks efficiently.
✅ JIT Compilation makes JavaScript faster by optimizing code while running.
✅ Variables (const, let, var) store values, with const being unchangeable, let being flexible, and var being outdated.
✅ Garbage collection ensures JavaScript manages memory efficiently.
✅ Understanding how JavaScript works behind the scenes helps you write better, more efficient code.
Next Steps
Now that you understand how JavaScript works under the hood, try experimenting! Modify the button’s behavior, use let instead of const, or add more events. The more you practice, the more JavaScript will feel natural and intuitive. 🚀